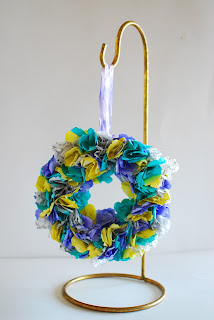
I had such a great time creating it, I thought I would make a little tutorial if ya'll wanted to have some fun, too! So, where do we start? How about with some supplies!
I used a 6" Styrofoam wreath form, a chopstick, some distress inks and one re-inker, die-cut tissue wrap flowers using tattered floral die, die-cut copy paper flowers using tattered floral die, floral pin, Tim Holtz idea-ology Trimmings and a mini-mister. (I didn't end up using the brown flowers in the photo)
Before I move on I want to get into some specifics with the supplies to help y'all out. The chopstick is for inserting the flowers into the wreath. I prefer the chopstick because it has a smaller and larger end. The larger I use for the majority of my flowers but the smaller end is good for filling in smaller gaps and spaces. You could totally use a wooden dowel or the end of a paint brush.
Using my Vagabond, I cut down 6 sheets of 12x12 tissue wrap into four inch squares to die-cut the flowers. I chose to use copy paper because I needed something that had a "give" to it once I formed the flowers. Cardstock would be way too thick. I used 12 sheets of 8.5x11 cut down to 4 inch squares. And can I just say I love my Vagabond so much??? I was able to cut through 20 pieces of copy paper at a time! (I wouldn't recommend more than that.) My die-cutting was done in no time.
Next I gently wrinkled and inked up all of my white flowers. I was originally going to ink the tissue wrap flowers, but decided against it. I also stuck to just the seasonal Spring distress inks color palette. I was going to add in some mowed lawn and picked raspberry but decided since it was a smaller wreath I didn't want too many colors making it look out of control and busy.
Next I wrapped a flower around my chopstick and inserted it in to the Styrofoam base. Don't push your chopstick all the way to the bottom and through to the other side; just about a quarter inch or so down into the base.
Keep going and alternating colors and tissue wrap as you work your way around. This surprisingly goes pretty fast and it's fun.
Ta-Da! Done! But wait... there's more...
Fold and glue approximately ten flowers in half and then alternating colors and slightly overlapping the edges, hot glue them around the outer and inner edges of your wreath. But hang on... we still aren't done.
Get on out another sheet or two of copy paper and cut and ink up a few of the smaller flowers. Using the rosette technique Tim taught in this video I made a few more small flowers.
I then hot glued these to the inner circle of the wreath. I did have one booboo when making these and that was I forgot to twist back the petals to give them more "floweryness." (That's a word. I swear on a twinkie.) So don't forget that part! It makes a big difference!
I then used some shaded lilac distress re-inker and a mini-mister to give color to some Tim Holtz trimmings. I like to let it dry all bunched up as the color comes out with a cool tye-dye/ombre look.
When that dry, trim down a double-pronged floral pin (or just find a shorter one which I have never been able to do.) and push this through the ribbon and into the wreath.
Voila! All done! Let's look at that finished project again!
There you have it crafters! This wreath was so much fun to make and you could do it using book paper, all tissue wrap, (brown paper bags look super cool!) and in any color palette your little creative heart desires!
Good luck to everyone that entered into Tim's tattered floral challenge! There are some truly amazing and inspiring projects posted on his blog! I know Tim is going to have a hard time making a decision! Happy Spring and happy creating!


1 comment:
Oooo this is truly fabulous, the colours, the flowers......just yummy! Good luck Sara :0)
Kaz x
Post a Comment